It can be a little daunting when getting your graphic designs printed as there can be so many different elements to consider – file size, colour profile, and numerous printer marks to name a few!
When setting up your print file there are certain specifications you need to take into consideration to ensure that your designs are printed as you intend. Luckily once you get your head around each of these elements, they are very easy to add, and as you get more experienced with the printing process these will come as second nature. You can read our previous blog post for an overview of all print marks and what they mean, but here we wanted to delve a little deeper into bleed marks – an extremely important element of the print design process.

What are bleed marks?
Bleed marks are an extension of your final file on the outer edges of the page which ensure that the print is completed as intended. The additional bleed area means that your design – particularly colours and images – will go to the very edge of the page of your finished product. If your file is sent to print without bleed marks, the chance of your design being printed with a thin white stripe along the outer edge is high. Bleed marks should not be confused with crop marks (also known as trim marks), which can be seen on the corners of a file and indicate the final trim itself.
Why do bleed marks matter?
It is worth bearing in mind that when your file is printed commercially, it is printed on a substrate larger than your file and then trimmed to size. This 3mm bleed acts as a buffer and ensures that images and colours bleed out instead of ending abruptly before the edge of your substrate. The extra ink around the document allows for minimal movement when trimming and protects your design.
How do I set up bleed marks?
The industry standard bleed area is 3mm on each edge of your file. For example, if you are creating artwork on an A4 sheet of paper, the overall document size would be as follows:
A4 dimensions = 210mm x 297mm
Add an additional 3mm to each side of the width: 210mm + 6mm = 216mm
Add an additional 3mm to each side of the height: 297mm + 6mm = 303mm
Overall document size with bleed = 216mm x 303mm
Taking the above into consideration, you may think that when you come to create your file you can simply input 216mm as width and 303mm as height to incorporate bleed, however this would not then show the printers where the file needs to be trimmed. Therefore, it is important to set up your bleed properly, as the bleed marks are instructions for the printer’s as to where your file ends, and the bleed begins.
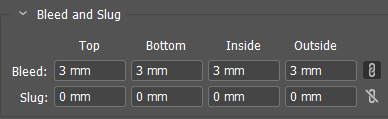
To add bleed in illustrator or Adobe InDesign is very simple. Go to Document Setup (or Crtl+Alt+P for windows, Cmd+Alt+P for Mac) in either programme and add 3mm into the bleed box (as shown below). This will then be shown as a red line around the outside of your file (as shown above). Make sure all colours and images extend out to this line, but remember this area won’t be included in the final product, so don’t have any important parts of your image here!
When exporting or saving your design, ensure that you have ‘use document bleed settings’ checked to make sure that the bleed marks are visible.
If you are still unsure about any printer marks, or want some help with your general document setup, we are always happy to discuss your project further and advise you on how best to format your design ready for printing.
Confident you fully understand bleed marks? Move onto DPI.
